So a while I go I ran into an issue where I’d want to merge two images together but I needed to do it on run time. Sometimes you need to generate images by combining a few or more images together as saving them as separate files is not very dynamic. This could potentially be used to merge character sprites with armor sprites in a 2D game or different cards and rarities, the possibilities are endless! 😀

The easiest to merge are textures that are of the same size. You would just take the bottom image and slap the top one on it like a sticker without having to worry about any pixel offsets, like this:

Texture2D MergeTextures(Texture2D texture_1, Texture2D texture_2) {

    Texture2D merge_result = new Texture2D(texture_1.width, texture_1.height);

    for (int i = 0; i < merge_result.width; i++) {
        for (int j = 0; j < merge_result.height; j++) {

            Color tex1_color = texture_1.GetPixel(i, j);
            Color tex2_color = texture_2.GetPixel(i, j);
            Color merged_color = Color.Lerp(tex1_color, tex2_color, tex2_color.a / 1);

            merge_result.SetPixel(i, j, merged_color);

        }
    }

    merge_result.Apply();
    return merge_result;

}

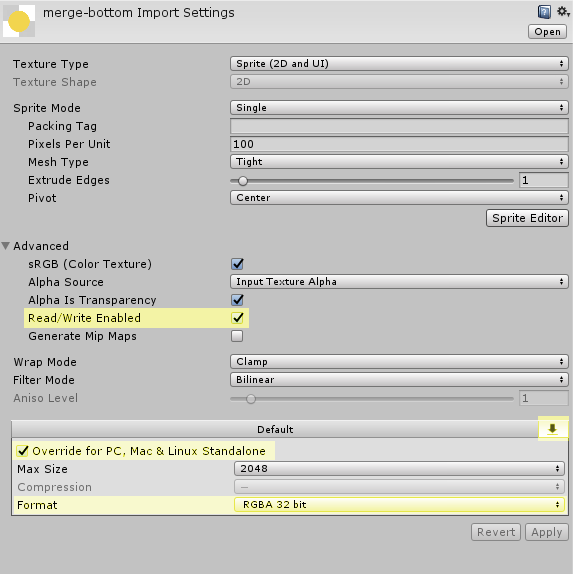
Make sure the textures you are using are set to read/write enabled and The compression format is set to a supported one or you will be seeing some errors.
Unity3D and Merge Textures

How to use
// tex_bottom and tex_top are set as public types of Texture2D
// which I set to my textures in the inspector
 
Texture2D tex_result = MergeTextures(tex_bottom, tex_top);
Saving the merge result to file
File.WriteAllBytes(Application.dataPath + "/test.png", tex_result.EncodeToPNG());
Using the Merged result as a sprite on a sprite renderer
// output_sprite is a public SpriteRenderer that I set in the inspector

Rect sprite_rect = new Rect(0, 0, tex_result.width, tex_result.height);
output_sprite.sprite = Sprite.Create(tex_result, sprite_rect, new Vector2(0.5f, 0.5f));

Unity3D and Merge Textures

Unity 3D and Desaturation Shader

So this piece of code is for a custom desaturation shader you can use in Unity to desaturate (greyscale) any texture by changing the shader, which you can do either manually of via code.

Shader "Custom/Desaturate" {
     Properties  {
         _MainTex ("Texture", 2D) = ""
     }
     SubShader {
         Blend SrcAlpha OneMinusSrcAlpha
         Pass {
              Color(.389, .1465, .4645, 0.5)
              SetTexture[_MainTex] {Combine one - texture * primary alpha, texture alpha}
              SetTexture[_] {Combine previous Dot3 primary}
         }
     }
 }

Just right click on your project view and create a new Shader and put this code in there. Save it with any name you’d like. The share will now appear under the “Custom” list when selecting a shader for your material. To assing it via code, you would do this:

referenceToMyObject.renderer.material.shader = Shader.Find("Custom/Desaturate");

Very simple!

Moving notice:
Minor edits to post.

A lot of types of games (building, simulation, strategy for example) use a virtual grid system. Today I’m going to show you, how to move objects on a virtual grid. As before, I have uploaded all my files free for you to use.

Unity3D and A Basic Grid System

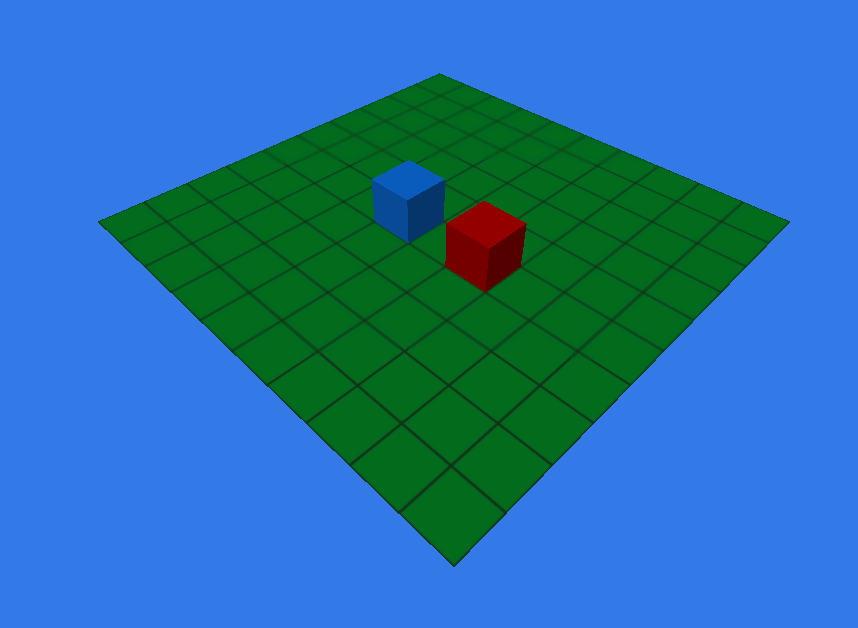
So this is what my game view looks like for this tutorial. The “ground” is a default unity plane (Scaled 1 x 1 x 1) for which I created a small texture to represent one grid “box” and set the material tiling to 10 x 10 so the total plane would be a virtual grid of 10 by 10. The ground also has it’s tag set to “ground” to contain the movable cubes in this specific area.

The cubes are just 2 default cubes with different colored materials attached to them.

The only script, GridMoving.cs, used in this tutorial, is attached to the Main Camera.

Download GridMoving.cs
Download Grid.png

Moving notice:
Minor edit to post.

So as mentioned on the original blog, it has moved over here. It’s still in process so bear with me as I am in the process of moving some of the tutorials over here as well as leaving some behind since they have become irrelevant.

I also have a bunch of ideas/tutorials in progress to make an appearance here in the days to come.

Hurray!

One of the first things I had to do, was figuring out how to connect to an external server via Unity client using a TCP/IP socket. It took a lot of searching to find help on this issue but I did find it eventually. I’ve added links to my files here so you can view/use them.

So to get your Unity application to connect to an external server via TCP/IP socket, you will need the following:

TCPConnection.cs – the connection handler, server communications
socketScript.cs – the script attached to one of the GameObjects in Unity (I used the Main Camera). We will use this script to attach a copy of TCPConnection.cs to the Camera as well.

I’ve added comments to the important things, hopefully they make sense.
If you want to use javascript instead of C# for your socketScript and application in general, remember to move the TCPConnection.cs into the /Assets/Standard Assets folder (just create it if it doesn’t exist) for it to work. In my case (since I used C#, I just put them both in the /Assets/Scripts folder).

I wrote my own very basic C++ windows socket server to test this. When interacting with server, make sure that your server returns the newline command after every response, otherwise your unity client will be left to hang (until the server disconnects). For our server we had to use \n but it depends on what type of server you are running.

If you want to have multiple connections (like for most games, you’ll have the login server and the game/world server), you just got to add another instance of TCPConnection.cs to your socketScript.

Moving notice:
I wasn’t gonna bring over both posts separately, so this already includes the updates for multiple messages at once and using the split method to separate them. Also I’m now hosting these files here on this actual server instead of my synamicdsolutions URL.